How to Hook Up a Tank-Type Water Heater – DIY Tips
 Image source: Pixabay
It's one thing to buy a tank-type water heater and another thing altogether to install it. Whether it's a gas or an electric tank-type heater, it is crucial to get it correctly hooked up. This is vital because an improper water installation could easily become a health hazard. It could also lead to flooding, a fire, or an explosion.
Again, a properly installed heater could be the difference between energy efficiency and energy loss, high or low performance, plenty, or not enough hot water. Therefore, in this article, we'll look at how to install a new water heater, attach it to water, gas, and electricity, and share essential tips as well.
Important things about tank-type water heaters
Basically, tank-type water heaters are also known as storage-tank water heaters. In residential applications, they store from 2 to 100 gallons of water, which can be heated and used at any time.
Naturally, the size of the tank will determine how much hot water you can have in one go.
The first-hour rating and recovery rate will determine how fast one heater can have hot water ready, which is important when more than one person is taking a shower, for example.
Generally speaking, there are two popular types of tank-type heaters. There's the heater type that runs on gas (natural or propane gas) and the one that is connected to electricity.
Of course, there are other types, such as wood, oil, or solar-powered heaters. But, for this article, we're mainly concerned about gas and electricity.
So, if your tank-type heater runs on either gas or electricity, then this article is for you. We should probably mention that you could always call a technician to handle the installation.
That's okay.
But, if you like to roll up your sleeves and get your hands a little dirty, then keep reading. But keep in mind that moderate knowledge about codes, plumbing, gas, and electricity is needed, so as the proper tools.
Note: If you prefer showers with an unlimited flow of hot water, on-demand, and in continuous supply, check out tankless water heaters.
If you have to remove an old water heater
- Turn off the water, gas, and electrical supply.
- Drain all the water from the heater, but be careful as the water might be hot.
- Disconnect plumbing, gas, and electricity supply.
- If the old heater was a gas type, remove the exhaust hood, and if it is still in good shape, you can install it on the new heater.
If you need a step-by-step guide on how to remove an old water heater, check out this article.
- Find Plumbers In Your Area -
How to hook up an electric tank-type water heater
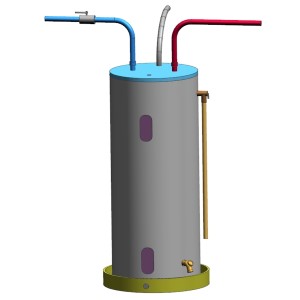
 Electric tank-type water heater
First, we'll talk about how to hook up an electric tank-type water heater because it is not as complicated as setting-up a gas-type. If you are a DIY kind of person, installation should be straightforward for you.
Before you begin hooking up the heater, it is important to ensure that you have all the necessary tools and materials.
Below is a list of some of the things you'll need for this DIY project:
- A suitable voltage tester – multimeter
- Adjustable wrench
- Pipe wrench
- Tools and materials for soldering/PEX installation
- Tube cutter
- Wire strippers
- Hammer
- Pliers
- Screwdrivers
- Plastic twist caps
- Tape (TEFLON) or pipe dope
- Level
- Hand trucks or moving dolly
Now that you've got all the tools you need, here is a step-by-step guide on how to hook up a water heater.
Read the user manual first
Well, it does seem like a pretty obvious step, right? But you will be surprised how many people conveniently skip this step. Including me! Even if you are a DIY pro, it is important to read the manual. This is because manufacturers have specific instructions for different models. So, go through the manual, even if it's only once.
Examine the water heater wiring
Turn off the electricity in the main electric panel. This is a precaution to avoid electrocution. Actually, if you're doing a replacement, you must do this even before the old water heater is removed.
Next, grab hold of your voltage tester and place it against the bare tip of the wire from the main electrical home supply and which will be used to connect the heater. This step is to confirm that the electricity is off.
Place the electric water heater in position
Then, you should get the water heater in position, ready for installation. If you have someone assisting you, then that person can help you with this. But if you are truly doing it yourself, then a hand truck will be just fine, or a moving dolly.
It is recommended to buy and install a drain pan under the water heater to prevent object damages due to leakage.
Level it out
Okay, so you have examined the wiring, and you've got the heater in the correct position. The next thing is to use a level on top of the heater so that it's all leveled out. You can use shims for that; this guide will show you how.
If you are not sure what is the best location for your new water heater, check out this article.
Take off the metal plate that's over the wiring
Take off the metal plate that's used to cover the wiring on top of the heater. Once you have access to the wires, use wire strippers to strip half an inch off the insulation wires.
Punch out the knockout hole
Now, there's a knockout hole at the top of the tank. Find it and use a hammer and screwdriver to force it down. Next, connect the cable connector to the knockout hole using the screw by the side. Make sure it's screwed on tightly to keep the cable from sliding around and getting damaged.
Get the cable inserted
So, there's an electrical cable that runs from the main electrical panels. This should be inserted through the conduit. To do that:
- Slide one end through the cable connector to the top of the electric water heater.
- Keep sliding till it connects with the wires inside the heater.
- Tighten the end of the conduit by inserting it into the cable connector and screw it on tightly.
Twist the electric cable with the red and black wires
Get the red wire from the electrical cable and twist it with the red wire from the water heater. Repeat the process using the black wire. You can use a pair of pliers for this. Then, use a plastic twist cap on the wires and twist several times till it's tight.
The bare ground green wire from the cable should be wrapped around the green ground screw on the water heater and screwed tightly.
Insert the wires
Now, place the wires back into the top of the water heater and cover it with the metal plate.
Wrap the pipe threads
Locate the heat trap nipples on top of the unit. If connecting two different metals (copper to steel, for example), you should use dielectric nipples to reduce corrosion. The cold water inlet has a blue ring, while the hot water outlet has a red collar. You should wrap both ends of the threads with the Teflon tape or use the pipe dope instead. Once attached, the home plumbing to the heater will prevent leaks.
Install the expansion tank
Use this article to learn how to install an expansion tank for your water heater size. These devices are usually installed on the cold water supply.
Connect the electric heater to the home plumbing
At this point, you need to connect the water heater to the cold and hot water pipes (home plumbing). From the water heater, go with the copper pipe first - at least 18", vertically. From there, you can either continue with the solid connection such as copper or flexible such as PEX. Or, even simpler, use the braided flexible steel hose to start with.
Install the discharge pipe
We will assume that the temperature and pressure relief valve (TPR valve) was (factory) installed. Install the discharge pipe. One end of the pipe is attached to the TPR valve while the other end terminates approximately 6 "from the floor drain or a bucket.
Open the cold-water valves
Open the cold-water supply valve (shut-off valve). This valve supplies cold water to the tank for heating. Once it's open, turn on the taps in the house and let trapped air out. At this time, you can check water connections for leaks.
Turn the valve off once the tank is full of water.
Set the thermostat
Set the thermostat. The ideal temperature is anything from 120 degrees to 125 degrees Fahrenheit. This is also a factory default setting. The maximum temperature is around 140 F.
Note: Ensure that the water heater is full of water, or your heating element will burn out.
Turn on the main power
Finally, it's time to turn on the main electrical panel, and your electric tank-type water heater is ready to heat.
Hooking up a gas tank-type water heater
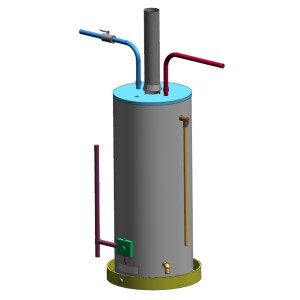
 Gas tank-type water heater
Okay, we've gone through the steps you'll need to get an electric tank-type water heater installed and ready to go. Now, we'll talk about the installation of a gas tank-type water heater.
Most of the tools are described in the above text, but here are the tools you will also need:
- Gas plumbing tape
- Earthquake straps
- Carbon monoxide detector
- Leak detection solution
- Flue pipe (vent) if installing an atmospheric type
- Metal screws for vents
Instructions
The procedure is similar to hooking up an electric water heater with the addition of attaching the gas pipe and vent system.
Make sure the gas supply is turned OFF.
Also, use the earthquake straps to secure the water heater to the wall properly.
Attach the vent and gas line
Attach the vent pipe to the draft hood using the sheet metal self-tapping screws. Make sure to have the vent pipe rise vertically at least 12" before installing the elbow.
Using the flexible gas hose, connect the gas control valve to the water heater and the gas supply line.
Use the yellow gas plumbers' tape, or joint compound, for any threads on the gas pipes to prevent any gas leaks. But before that, clean all the threads with the wire brush and a cloth.
Open the gas and use the leak detection solution to search for leaks; a bubble is a sign of a leak. Tighten all the connections if you have to, and light the pilot using the directions found on the label or in this article.
Since the atmospheric type water heater relies on natural draft, make sure there is no backdrafting and a water heater is properly venting.
Conclusion
Hooking up a tank-type water heater does not have to be stressful. True, it might be a bit intimidating if this is your first time. But if you carefully follow this guide, you will find that it isn't as daunting as it appears to be. Of course, you can always call a plumber who will be happy to install your new water heater. Or even better, have them contact you.
Related
Leave a Comment
